

A daily skid steer inspection takes only a few minutes, but it can prevent injuries, expensive repairs, and lost production. Skid steers operate close to people and obstacles, and they depend on hydraulic pressure, safety interlocks, attachment locks, tires or tracks, and structural components working correctly. A missing pin, damaged hose, low fluid level, blocked cooler, or failed seat-belt latch can turn an ordinary job into a serious incident.
The best inspection routine follows the same sequence every day. Park on level ground, lower the attachment, shut down the engine, remove the key, and walk around the machine in one direction. A repeatable path reduces the chance of forgetting an area. The operator should inspect the machine and the surrounding work zone before startup, then perform functional checks from the seat before beginning productive work.
This guide provides a complete daily routine for skid steers and compact track loaders. Machine-specific requirements still come from the operator manual. The checklist should be adapted to the model, attachment, jobsite, weather, and company safety program.
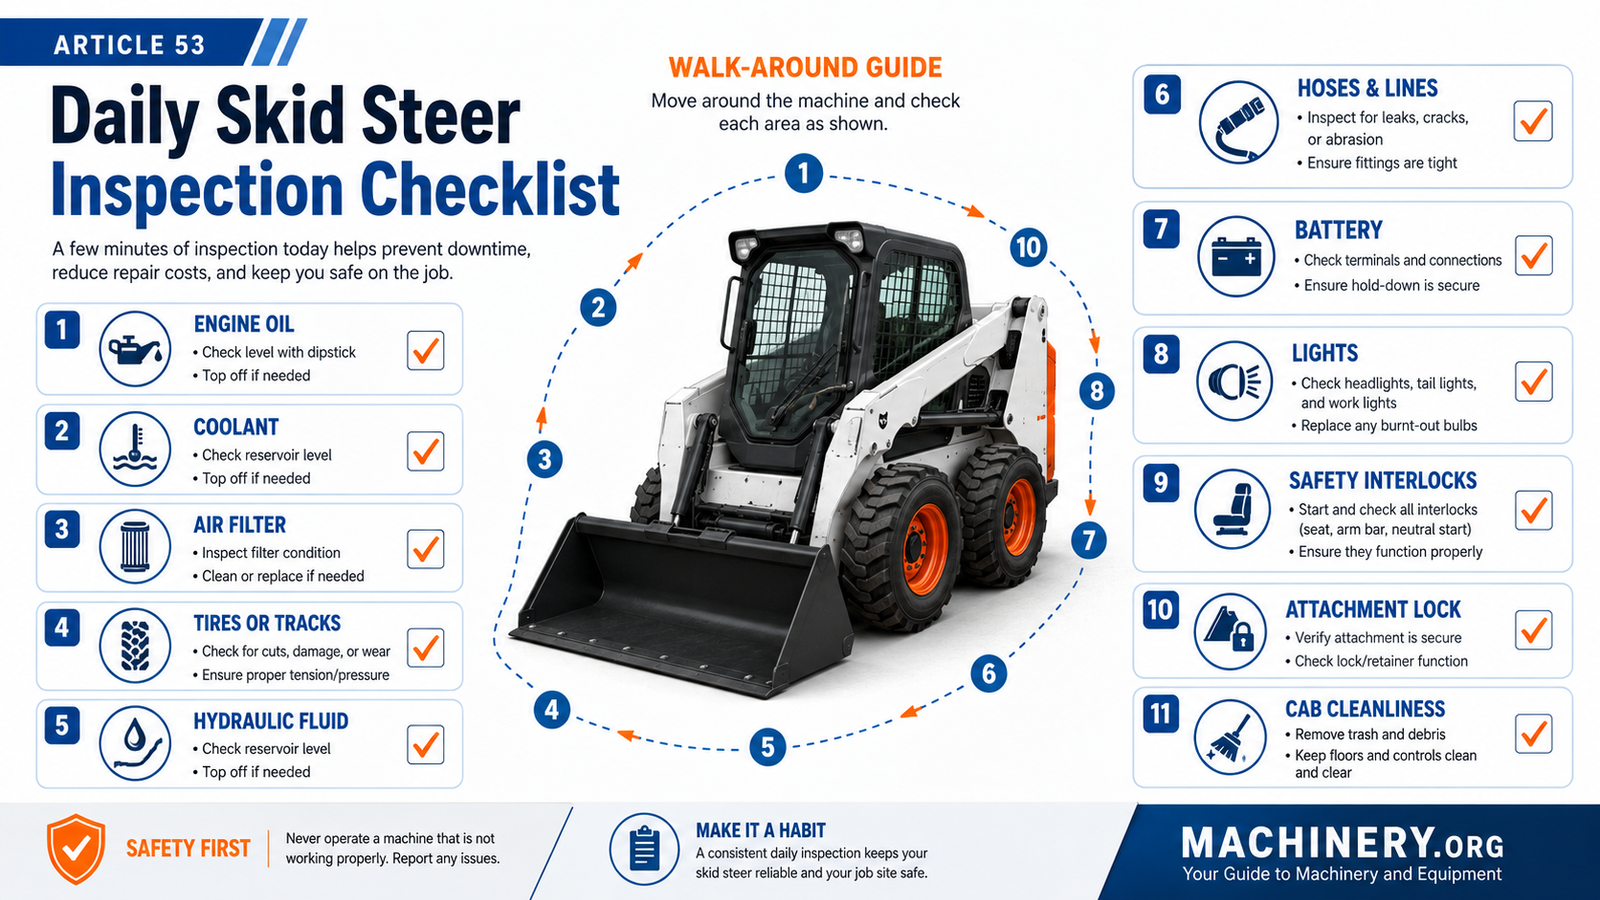
Figure 53.1. Daily skid steer walk-around checklist covering fluids, filters, tires or tracks, hoses, battery, lights, safety interlocks, and attachment locks.
Prepare the machine for inspection
Before walking around the loader, lower the bucket or attachment flat to the ground. Place the controls in neutral, engage the parking brake, shut off the engine, and remove the key. Wait for moving parts to stop. If an attachment or loader arm must be raised for service, use the approved lift-arm support device and follow lockout procedures. Never rely on hydraulic pressure alone to hold raised components.
Check fluids and the engine compartment
Inspect engine oil, coolant, fuel, hydraulic fluid, and any model-specific chain-case or drive fluid. Look for unexpected level changes because they may indicate leaks or internal consumption. Check the engine compartment for loose belts, damaged wiring, nests, debris, and fluid stains. Examine the air filter restriction indicator and clean the intake area. Keep radiator and oil-cooler screens clear so heat can escape.
Inspect tires, tracks, and the undercarriage
On wheeled skid steers, check tire pressure, cuts, sidewall damage, missing lugs, uneven wear, and loose wheel hardware. Tires should match in size and wear so the drive system does not fight unequal rolling distances. On compact track loaders, inspect track tension, cuts, missing tread, embedded debris, rollers, idlers, and sprockets. Remove rocks, wire, and packed material from the undercarriage.
Inspect hydraulic hoses, cylinders, and couplers
Look for wet fittings, rubbed hose covers, bulges, exposed reinforcement, cracked lines, leaking cylinder seals, and loose clamps. Check auxiliary couplers for cleanliness and damage. Do not touch suspected pinhole leaks with a hand. A high-pressure injection injury is an emergency. Damaged hydraulic components should be repaired before the machine returns to work.
Check the attachment and quick-attach system
Inspect the bucket, forks, grapple, broom, auger, or other attachment for cracks, wear, loose hardware, damaged hoses, and missing guards. Verify that upper hooks, lower pins, locking wedges, and retainers are fully engaged. Test hydraulic or manual locking indicators. An attachment that is not fully secured can detach unexpectedly during travel or lifting.
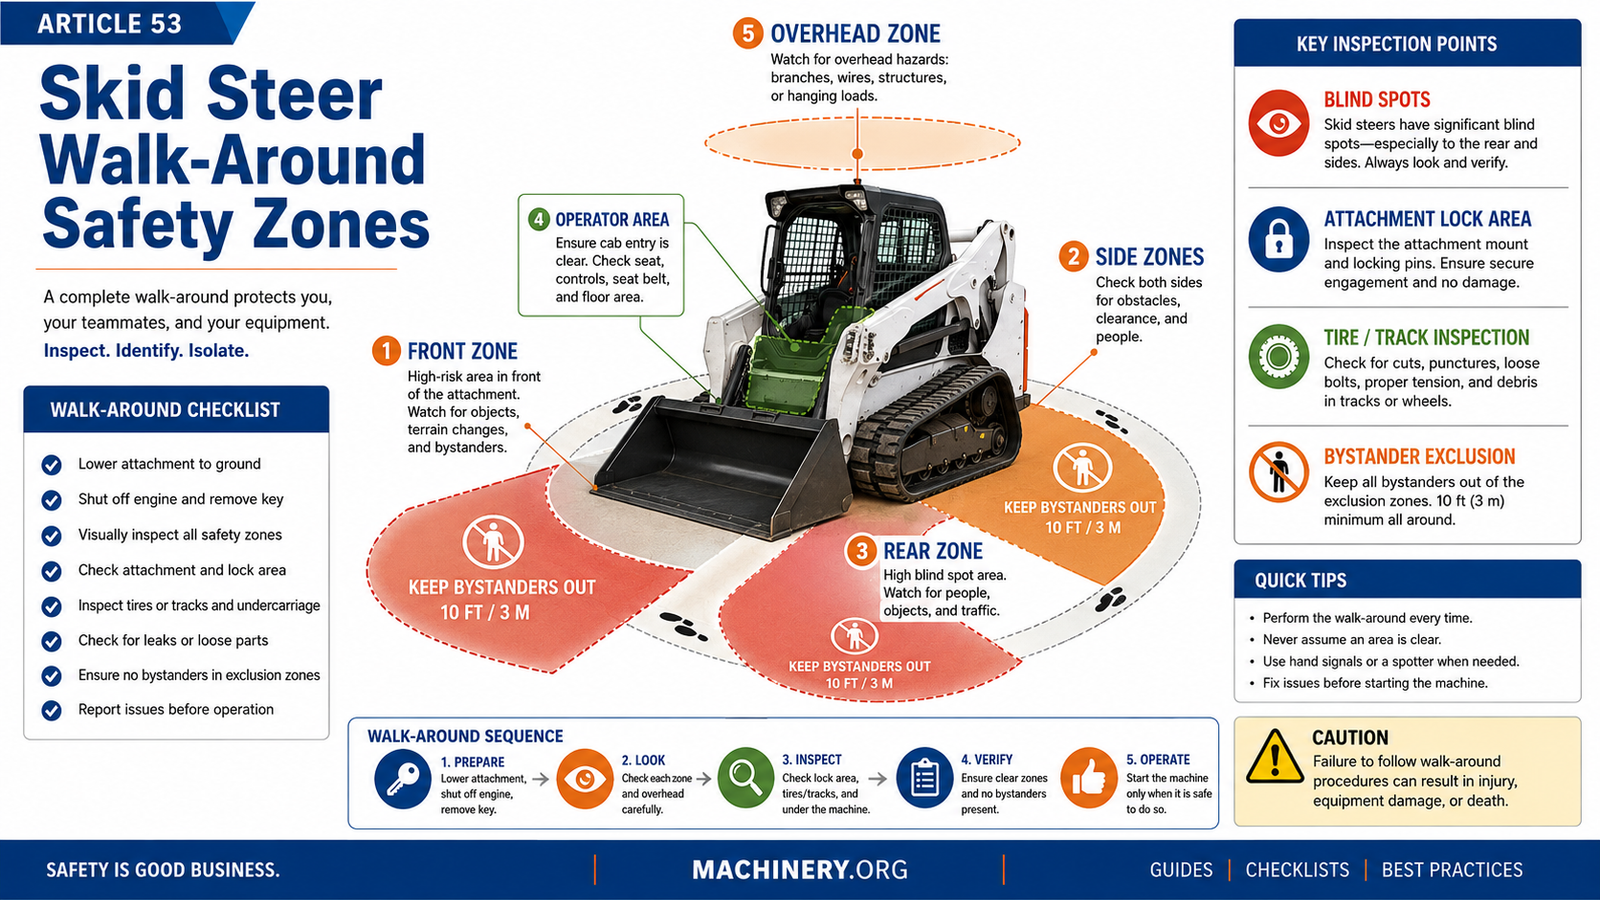
Figure 53.2. Walk-around safety zones showing front, side, rear, overhead, operator, and bystander exclusion areas.
Inspect the operator area and safety systems
Clean the cab floor so pedals and controls cannot be obstructed. Check the seat, seat belt, arm bar, door, windows, mirrors, camera, horn, lights, backup alarm, fire extinguisher, and display. Confirm that required safety interlocks prevent operation when conditions are unsafe. Never bypass seat, door, restraint, or neutral-start systems.
Walk the jobsite and identify safety zones
The machine inspection is only half of the routine. Walk the planned travel and work area. Identify drop-offs, trenches, overhead wires, soft ground, hidden utilities, unstable slopes, low structures, traffic, and pedestrian routes. Establish a bystander exclusion zone. Skid steers have significant blind spots at the rear and sides, and the attachment creates a high-risk area at the front. Use a trained spotter and agreed hand signals when visibility is limited.
Perform startup and function checks
Enter using three points of contact, fasten the seat belt, lower the restraint bar, and start the engine according to the manual. Review gauges and warning indicators. Allow appropriate warm-up, especially in cold weather. Test steering, travel, service brake or parking brake, lift, tilt, auxiliary hydraulics, horn, lights, alarm, and attachment lock. Listen for unusual sounds and watch for leaks after components begin moving.
Report and document defects
Record the machine number, hour-meter reading, date, and operator name.
Describe defects clearly instead of writing only “needs repair.”
Mark urgent safety defects as out of service and prevent unauthorized operation.
Notify maintenance personnel promptly and attach photos when helpful.
Review repeated defects because recurring leaks, loose hardware, or uneven wear may indicate a deeper cause.
Keep inspection records to support preventive maintenance, warranty, and resale documentation.
End-of-shift inspection
At the end of the day, park safely, lower the attachment, clean accumulated material, inspect for new damage, refuel or recharge as required, and record any changes noticed during operation. Grease the machine at the recommended interval. A short shutdown inspection makes the next morning safer and gives maintenance teams time to repair problems before the next shift. The operator should also compare the machine condition with the morning inspection. New leaks, damaged tires, loose pins, unusual heat, or attachment wear that appeared during the shift should be reported immediately. This before-and-after comparison helps maintenance teams identify when a problem started and prevents the next operator from inheriting an unknown hazard.
Frequently Asked Questions
How long should a daily skid steer inspection take?
A routine inspection often takes five to ten minutes, but more time is appropriate when conditions are severe or a defect is found.
Should the attachment be inspected separately?
Yes. Every attachment has its own wear points, guards, hoses, fasteners, and maintenance requirements.
What defects require the machine to be removed from service?
Major leaks, failed brakes, damaged restraints or interlocks, structural cracks, insecure attachments, severe tire or track damage, and critical warning lights are examples.
Why should inspections be documented?
Records improve communication, reveal repeated problems, support maintenance planning, and demonstrate responsible ownership and safety practices.
Key Takeaway
A consistent walk-around is one of the highest-value habits in skid steer ownership. Inspect the machine, attachment, operator area, and work zone in the same order every day. Correct defects before operation and document what you find.
Get More Expert Guides & Updates
Subscribe for Machinery.org guide updates and product learning content.